
Building a crossover with CrossoverUnit

This page shows how to create a crossover with Apple's AU Lab and the CrossoverUnit plugin. The example is a 3-way stereo design, and uses the Soundflower audio routing utility. At the end, alternatives without Soundflower are shown which are preferable in certain situations.
Required hardware: Multi-channel audio interface with one output for each driver, and a power amplifier for each driver.
Disclaimer! There's no warranty for this software. I have successfully run several sets of speakers with this setup. I provide it in the hope that it will be helpful, but I take no responsibility if you fry your $1000 ribbon tweeters. Use care and always start the volume low!
Part A: AU Lab
Step 1: Launch AU Lab
AU Lab is part of the Apple Developer Tools and is located in /Developer/Applications/Audio.
Step 2: Configure the document
2a: Output configuration: Assuming two 3-way speakers, set Output Channels to stereo and create three outputs.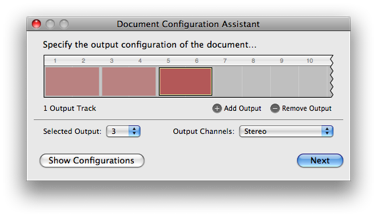
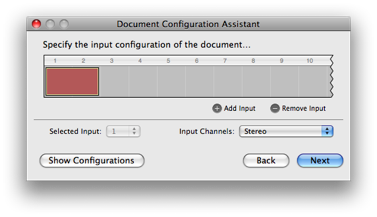
2b: Input configuration: Add one input to the document.
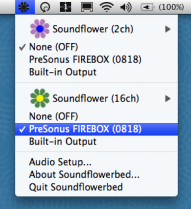
2c: Select Soundflower (16ch) device: Move the three outputs to channels 11-12, 13-14, and 15-16 respectively. Set the input to channels 1-2.
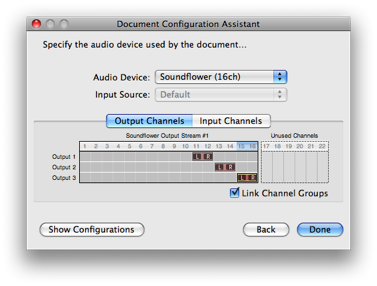
We do this because Soundflower does not distinguish between inputs and outputs: audio sent to channels 1-2 by other programs can be received here by using channels 1-2 as inputs. For the same reason, we must make sure our setup's outputs don't overlap with its inputs.
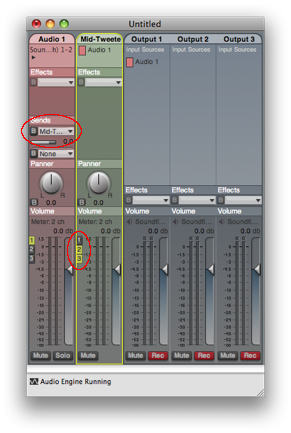
When you have finished this step, you will see a new document with three outputs. Output 1 is the woofer, Output 2 the midrange, Output 3 the tweeter.
Step 3: Add a bus
Note: This step is not necessary for 2-way crossovers. Conversely, for 4-way and larger crossovers, you will need more than one bus.
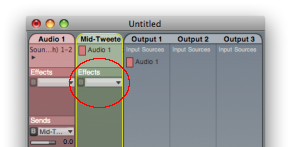
3a: From the Edit menu, choose Add Bus.... Call it Mid-Tweeter. We will use this bus to separate the woofer signal from the midrange and tweeter signals.
3b: Send the input signal to the bus by selecting the menu under Sends of Audio 1, and choosing Mid-Tweeter.
3c: Enable outputs 2 and 3 on the Mid-Tweeter bus, and disable output 1. This sends the bus signal to the midrange and tweeter channels, and removes it from the woofer channel.
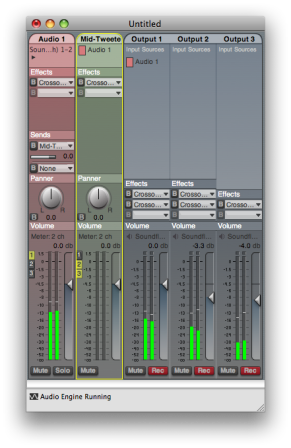
When you have finished these steps, your document should look like this:
Step 4: Configure the Woofer-Midrange crossover
4a: Under the Effects menu of the Mid-Tweeter bus, select APM/CrossoverUnit. If you don't see this option, the plugin has not been installed correctly. Go back and make sure the plugin is in the Components folder in ~/Library/Audio/Plug-Ins and relaunch AU Lab.
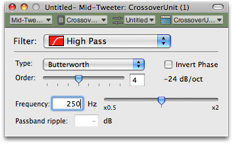
4b: In the CrossoverUnit settings window, select Filter: High Pass, and set the frequency and type of your woofer/midrange crossover filter.
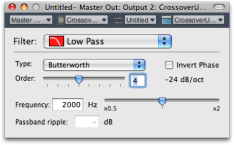
4c: Under the Effects menu of Output 1 (the woofer output), select APM/CrossoverUnit again. This time, select Filter: Low Pass and set the same frequency and type.
Step 5: Configure the Midrange-Tweeter crossover
5a: In Effects of Output 2, select CrossoverUnit. Set it to Low Pass, and configure the frequency and type of your midrange/tweeter crossover filter.
5b: In Effects of Output 3, select CrossoverUnit. Set it to High Pass, with the same frequency and type.
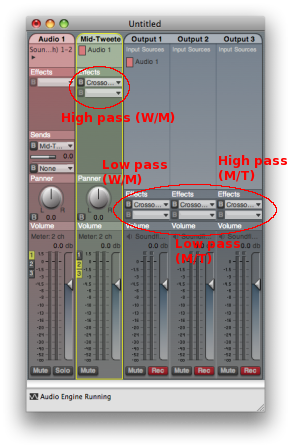
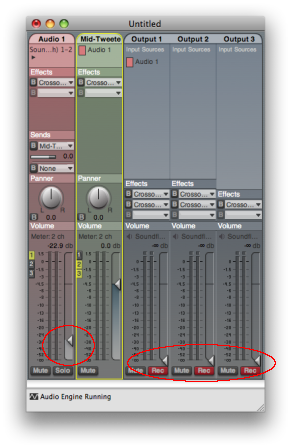
Your main window should look like this, with one CrossoverUnit effect and one blank effect for each output and the bus:
Step 6: Add driver-specific filters (optional)
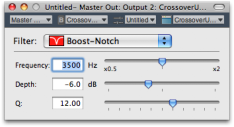
If, for example, your midrange has a high-frequency resonance that needs correcting with a notch filter, this should be added directly to the midrange channel (Output 2). Under Output 2, select the blank Effects menu and choose another CrossoverUnit. Configure this for Boost-Notch, with the desired parameters.
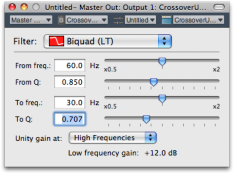
As another example, if your woofer is in a small sealed box, you could add Linkwitz Transform compensation to extend its low-frequency response (at the expense of amplifier power). Select the blank Effects menu under Output 1 and choose CrossoverUnit. Configure this for Biquad (LT) and set the parameters for your box and target performance.
Step 7: Add room correction or other global filters (optional)
Any filter applied to the input before the crossover should be added to the Effects list of the audio input (Audio 1). For instance, a notch filter could compensate for a low-frequency room mode.
Step 8: Adjust levels
The sliders for Outputs 1-3 control the respective levels of woofer, midrange, and tweeter. The slider for Audio 1 controls the master volume. Start these low to avoid any unpleasant surprises when you start testing!
Part B: Soundflowerbed
Step 9: Configure Soundflowerbed
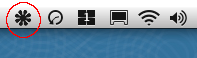
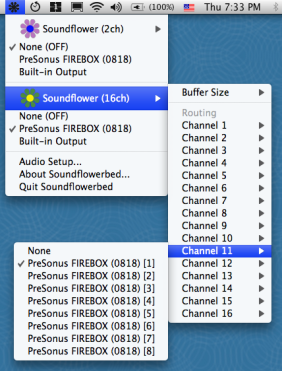
Soundflowerbed routes the audio from Soundflower to a hardware device. It is located in the Applications folder. When launched, it places an icon in the right-hand side of the menu bar:
9a: Select the output device: Under Soundflower (16ch), choose your audio device.
9b: Route output channels: Recall that in AU Lab, we set the woofers to channels 11-12, midranges to channels 13-14, and tweeters to channels 15-16. Now route those channels to the appropriate hardware outputs. Make sure it corresponds to how you've attached your drivers. Normally, channels 11-16 will be set to outputs 1-6.
Note: make sure channels 1-2 are set to "None." Channels 1-2 are the pre-crossover signal, and you don't want it running straight to your drivers.
Part C: Testing
Make sure each hardware output is attached to the correct power amplifier and driver. If your amplifiers have volume controls, start them low. If you've configured your crossover wrong, there's nothing preventing you from sending low-frequency signals to your tweeters, so be careful!
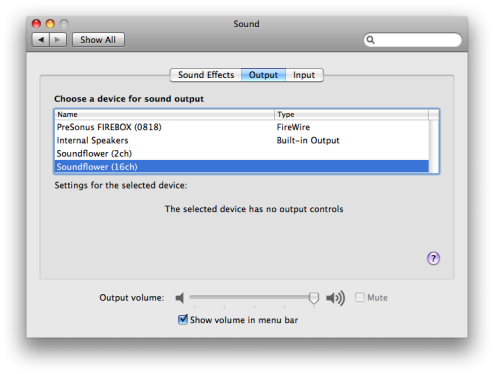
Step 10: Set the default audio output
In System Preferences, under Sound, set Soundflower (16ch) as your output.
Step 11: Make sure AU Lab and Soundflowerbed are active.
The AU Lab crossover is active if the bottom of the window says Audio Engine Running. Click it once to stop it, click it again to resume.
Soundflowerbed is active if a device is selected under Soundflower (16ch) and inactive if None is selected. If you run into problems, selecting None and reselecting the device sometimes clears it up.
Step 12: Play an audio file
Play audio in iTunes or another app. Gradually raise the master volume (Audio 1 in AU Lab). You should see a signal under Audio 1, and as you raise the volume of each output, a signal for each individual output. You should also hear sound if your amplifiers are on.
Step 13: Adjust settings
Adjust the relative levels of the outputs until the balance among drivers sounds right. Adjust and experiment with settings in the CrossoverUnits.
Note: the CrossoverUnit windows do not need to be open to be active. To remove a filter, select it in the Effects bar and choose "Remove CrossoverUnit." To bypass a filter, click the B to the left of its name.
Step 14: Saving and restoring
Save your work in AU Lab by choosing Save in the File menu. When you are finished testing, quit Soundflowerbed or disable it by selecting None under Soundflower (16ch). Later, you can reload your saved AU Lab document and reactivate Soundflowerbed.
Known Issues
There is a lingering problem that causes the audio to become heavily distorted after a period of time. It seems to related to Soundflowerbed, although my testing suggests the bug might actually be in CoreAudio or the hardware drivers. If the audio begins to break up, select None in the Soundflowerbed menu, and reselect your audio device.
If you don't see any signal in AU Lab when audio is playing, check your settings. Make sure Soundflower (16ch) is your default output, and if your audio app has its own settings, make sure it is selected there as well. Also make sure the audio engine is running in AU Lab and the output levels are up.
Crossovers without Soundflowerbed
If you have trouble with the sound breaking up, you can configure AU Lab to use your audio hardware directly rather than routing through Soundflowerbed. There are two changes:
Change 1: Set AU Lab to use your hardware device
You can do this when you create a new document, or change an existing document by double-clicking on the output name.

Change 2: Change your audio source
There are several ways to get audio into AU Lab without Soundflower.
Option A: Use a hardware audio input
If audio comes into your computer from an external source, you can use this as the input to AU Lab. Double click on the input group ("Audio 1") and select the appropriate hardware channels.
Note: the inputs and outputs must be on the same hardware device.
Option B: Use AUAudioFilePlayer
In place of the Audio 1 input, you can use what Apple calls a "Generator AudioUnit." One example is Apple's AUAudioFilePlayer, which plays files dragged into its window. To use it, choose Add Audio Unit Generator... from the Edit menu. Configure Sends the same way as in Step 3 (above).
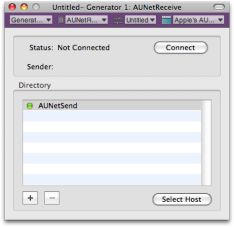
Option C: Use AUNetReceive
AUNetReceive is a versatile AudioUnit generator that receives streaming audio over a network. Add it in the same manner as AUAudioFilePlayer. You will need a corresponding AUNetSend unit to connect to. AUNetSend can be run on a different computer, or on the same computer in a different AU Lab document. It is activated by selecting Apple/AUNetSend under Effects of an AU Lab bus or output.
To route audio from iTunes to AUNetSend, you'll still need Soundflower! (You could also use Audio Hijack Pro, which is powerful but not free.) However, you won't need Soundflowerbed, avoiding the audio breakup problem.
Once you have AUNetSend running, you should see its name appear in AUNetReceive. Click Connect to start receiving audio.
Note: Inputs and generators can be deleted in AU Lab by clicking on them and selecting "Delete Selected Group" from the Edit menu.